Microsoft has become more keen on Windows users to use other Microsoft solutions as well, from Bing to Edge, and recently they have made it more difficult to set up a Windows 11 PC without a Microsoft account.
Before the 22H2 update, you can, for example, disconnect the Internet at the correct point of the process and in this way you can maneuver around the account requirements. This worked for some versions of Windows 11, but has since been removed Big Fall Update Until the operating system came.
But chances are, if you know the tricks.
Setting up a new computer that already has Windows 11 installed
There are good reasons why with a new computer you should go through the setup process for Windows, rather than ending up directly with a usable version of the operating system. Microsoft cannot legally document your acceptance of the Windows Terms of Use without you doing so. The problem is that one of the steps in this process also involves creating or signing in to a Microsoft account.
As mentioned, the old trick of disconnecting somehow has now been removed so now you can’t get away with it.
However, you can cheat Windows. It is relatively simple:
Just say “No thanks”!
When asked to add your Microsoft account, you are not entering the correct email address. Use for example [email protected] While that. It’s an address that’s been used many times by others – and while we know it doesn’t exist either – Microsoft’s servers will understand that it can’t be used and send you to a local user creation process instead.
But there is also another method that may suit other situations better. For example, if you are going to upgrade an old computer or build one yourself.
Start over – or upgrade
Windows can actually Downloaded from Microsoft Directly and completely free. Obviously, you will need a valid license code to use the downloaded file, but downloading it is very easy.
So the first step would be to download the ISO file.
The second step is to find – or buy – at least an 8GB USB memory stick. Note that all data on it will be permanently deleted during this process.

The third step is Download Rufus. You don’t even need to install it if you choose to download the premium version marked “Portable”. It can only run directly without installation, but if that’s something you’ll do often, you can probably install Rufus first as a last resort.
You can optionally download the ISO file via Rufus, if you prefer, but for full control you can do it yourself, as described here.
Once that’s done, insert the memory stick and use Rufus to make it bootable with Windows 11. Here’s how to do it:
- Select the memory stick under “Device” in Rufus.
- In Rufus, select Select to the right of Boot Selection and point to the Windows 11 ISO file you downloaded earlier.
- Click “Start” at the bottom of the Rufus window.
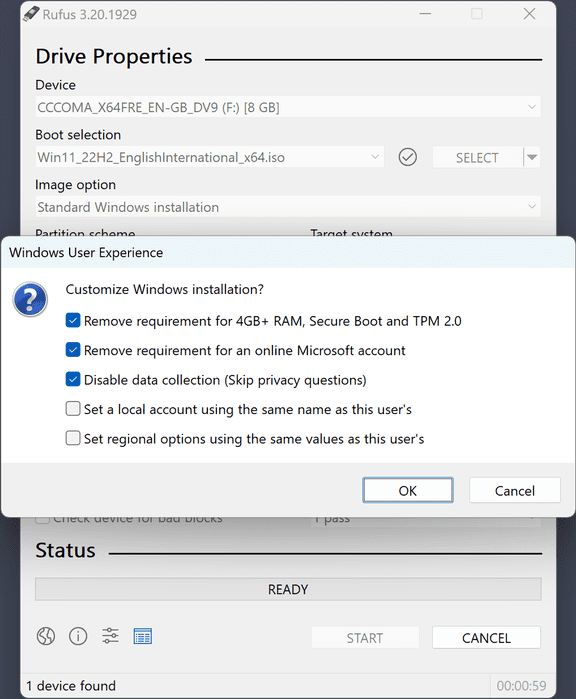
- You will then come up with a number of options that should look like this:

Note, however, that the options may vary somewhat, depending on your version of Windows and/or Rufus. In any case, you can choose to either remove the online Microsoft account requirements or automatically create a local account with the same name on the device that you can update later using the memory stick.
You will also be able to opt out of some other things, if you wish, but here too your options may differ somewhat. You will likely be able to opt out of, among other things, TPM requirements, minimum hard disk and memory capacity requirements and all data acquisition questions.
Once you have entered your choices, Rufus will warn you that the flash drive will be erased and ask if you really want to continue.
Press OK if you want.
Once you turn on Rufus, the memory stick will be “bootable”, that is, you can start your computer from it and run the Windows installation from there.
Once you’ve finished Rufus and your installation flash drive is ready, you can use it multiple times.
As mentioned, you must have a valid license code, but if you have Windows 7 or later on the same PC, there’s a good chance you won’t need to enter it again, as the code will be connected to your PC after the first use of the motherboard.
Some types of licenses can also be used on many devices.
If you have an unused icon from a previous version of Windows, you can probably use it as well, all the way to Windows 7. If an unused icon for Windows 7 doesn’t work, you can use it for Windows 10 and then update to Windows 11 The Windows 8 or later code should work directly with Windows 11, as long as it has not been used before and is of the correct license type.

“Web specialist. Lifelong zombie maven. Coffee ninja. Hipster-friendly analyst.”


